Upload data
Before uploading to DataStream, your data needs to be formatted so it follows the DataStream DS-WQX data schema. The Upload Template worksheets can be used to prepare your data in this format, and our Data Specialists can assist you in this process (contact us, team@DataStream.org).
Your formatted data file should be saved in CSV UTF-8 (comma delimited) (.csv) format.
Upload new dataset
These steps outline the process for uploading NEW datasets to DataStream.
***If you have an existing dataset that you would like to add data to or modify, please skip to the Update your dataset section for instructions.
1. Log in to your DataStream account
Click 'Login' via the top right header menu on Atlantic DataStream, Great Lakes DataStream, Lake Winnipeg DataStream, Mackenzie DataStream or Pacific DataStream.
2. Go to Upload Data in the header menu
This option should appear once you are logged in with an approved data steward account. For Data Steward approval, email team@DataStream.org. Try refreshing your browser if this option does not display when logged in.
3. From the My Datasets page, click Add New Dataset
Note: To add data to an existing dataset (e.g., by adding new observations from another field season), please follow the instructions for Update your dataset - Add new data.
4. Accept Terms of Use
Review and accept DataStream’s Terms of Use for submitting data.
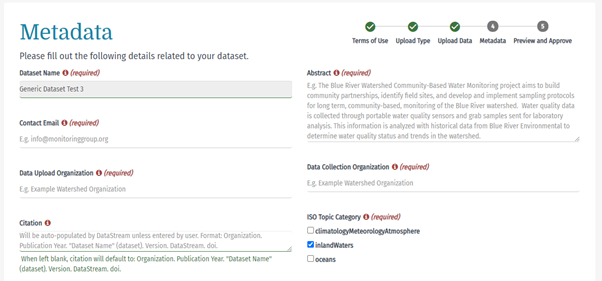
5. Input dataset-level metadata
Enter the information pertaining to your dataset. The fields in the online form correspond to those in the DataStream Metadata Form and the Dataset Metadata tab in the template. These can be completed in advance so that you have the information on hand.
6. Select Upload Dataset .csv
If setting up an automated integration, please see the Automated Import section.
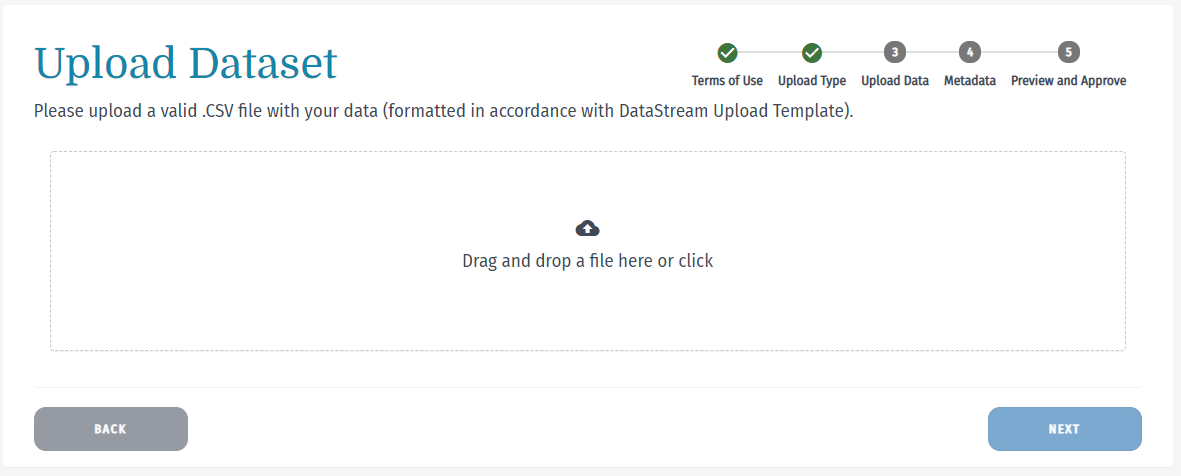
7. Upload data
Drag and drop your .csv file into the box or double click the box to access your file finder to select your file.
8. Review error and warning messages
Data submitted to DataStream must conform to DataStream's data schema. This schema outlines data structure, allowed values, and which fields are required or conditional.
Error messages will alert you to issues that are preventing your file from passing validation and which row numbers are impacted.
Warnings will list issues that may be present in your data and should be reviewed before upload. Warnings will not prevent the data from passing validation.
Once the issues in your file have been resolved, you can drag and drop the file back into the upload box (or double click within the box to access your file finder to locate and select the file).
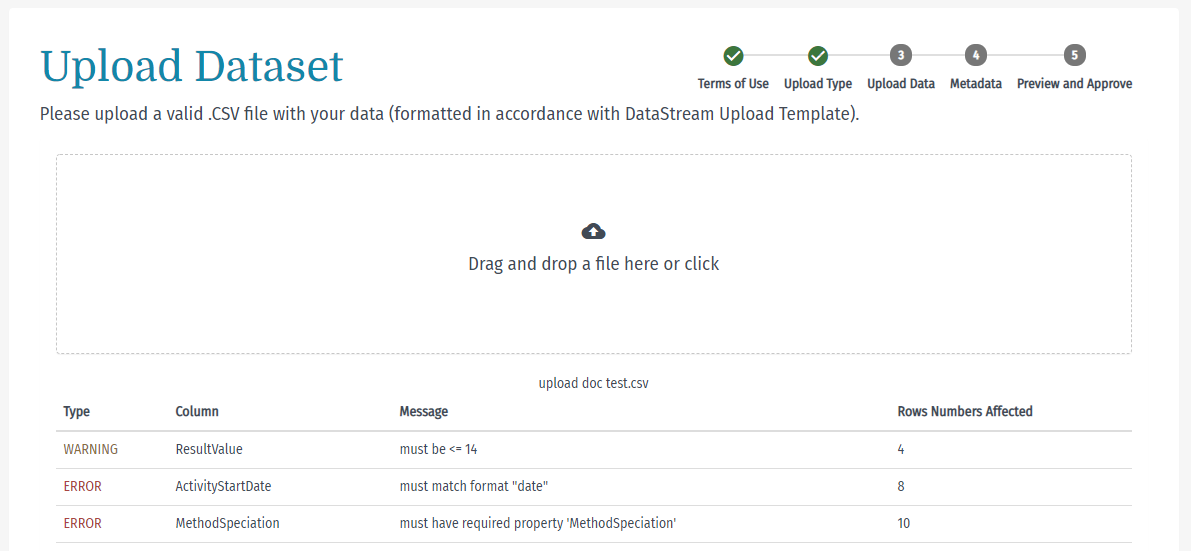
If you have any questions about the error or warning messages you are seeing, please contact us at team@DataStream.org.
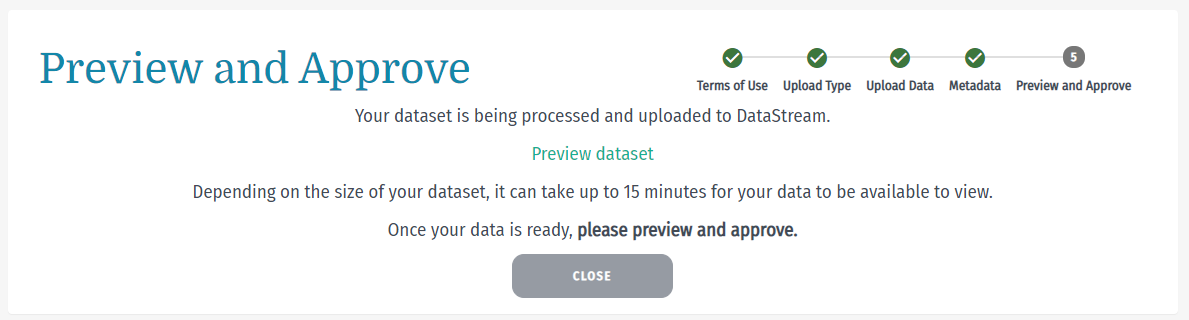
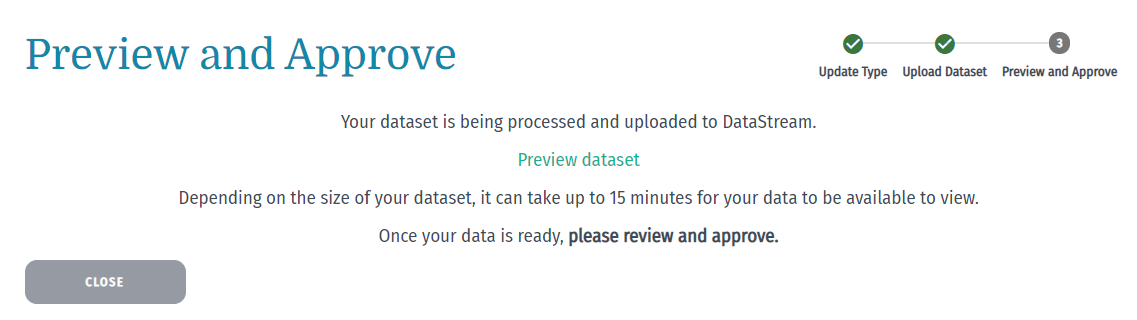
9. Preview your dataset
Once your dataset has uploaded, follow the 'Preview dataset' link to ensure the data is displaying properly. It may take a few minutes for the system to process the file and the link to appear. DO NOT close the tab or exit your browser until this appears.
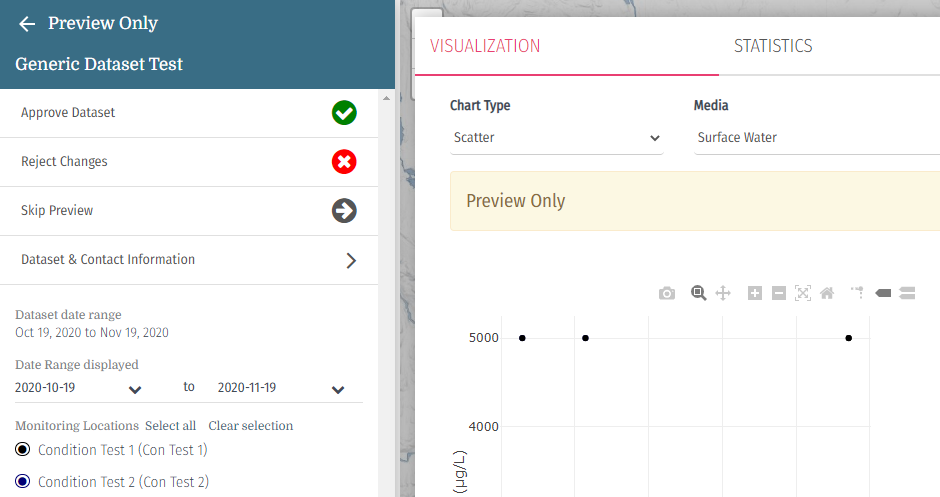
10. Approve your dataset or reject your changes
After reviewing your dataset, you can:
- Approve Dataset: Publishes dataset to DataStream (will be visible on the Explore map 24 hours after publishing)
- Reject Changes: Removes dataset file. On the My Datasets page, your dataset will now say "Waiting for initial upload"
- Skip Preview: Takes you to My Datasets page where the dataset can be approved or rejected at a later date
Note: After selecting approve or reject, you will either need to revisit or refresh the page in order for the change to appear on the My Datasets page. This process may take several minutes to complete.
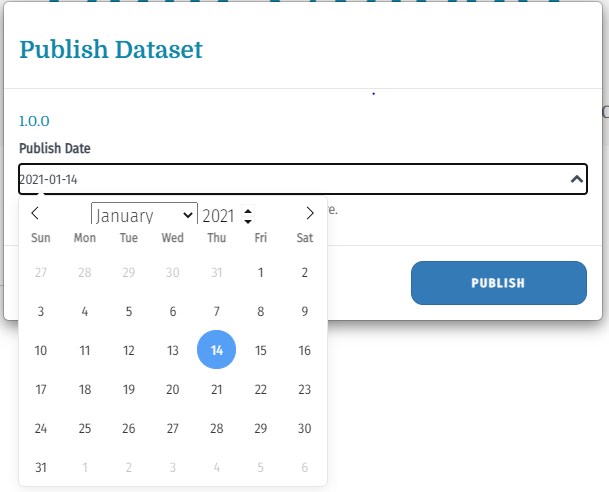
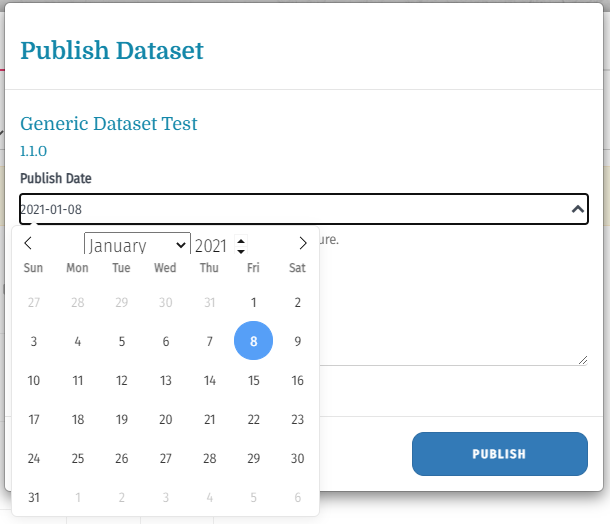
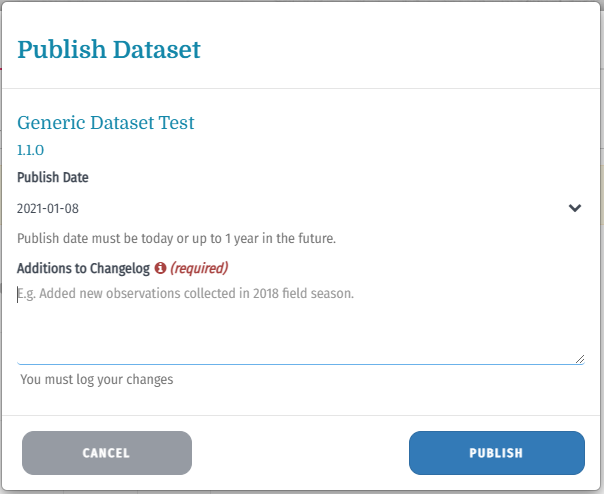
11. Select publish date
Use the dropdown to select your desired publish date. This will be the day when your data will be viewable by others on the DataStream site. To publish immediately, select today’s date, otherwise select up to 1 year into the future (learn more about embargo periods on DataStream).
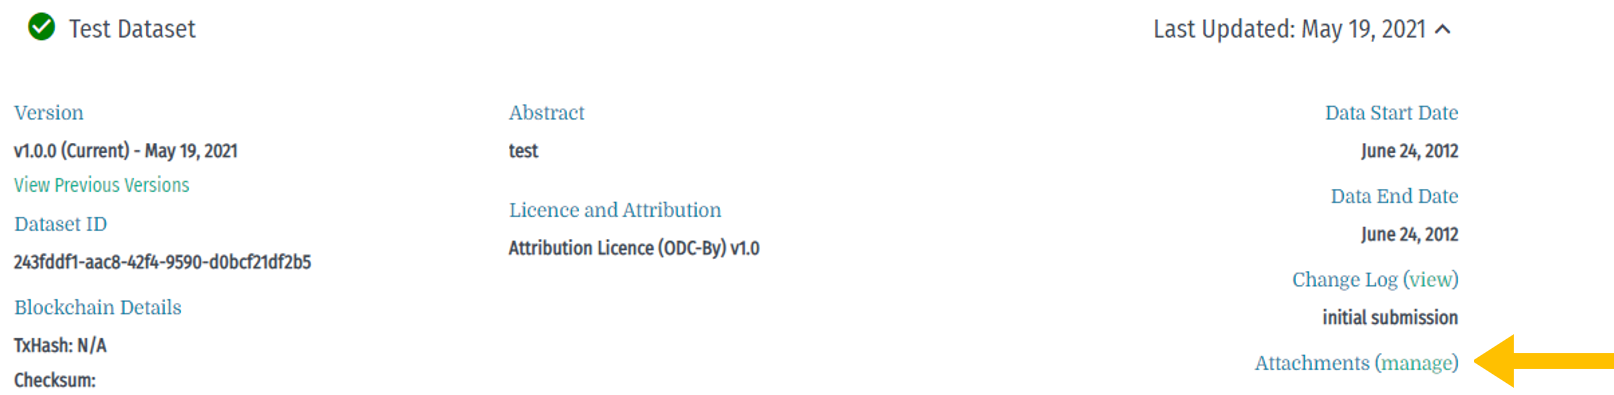
12. Add attachments (optional)
Once your dataset has been approved and published, click on the dataset from the My Datasets page. Select 'manage' next to Attachments to add documents related to your dataset (e.g. published papers, reports, or other analyses, monitoring and QA/QC protocols, etc). Make sure you add a name to the file to complete the attachment process.
Update your dataset - Add new data
Follow these steps to add new observations to your existing dataset. You will upload a file containing ONLY the new observations.
1. Log in to your DataStream account
Click 'Login' via the top right header menu.
2. Go to Upload Data in the header menu
This option should appear once you are logged in with an approved data steward account. For Data Steward approval, email team@DataStream.org. Try refreshing your browser if this option does not display when logged in.
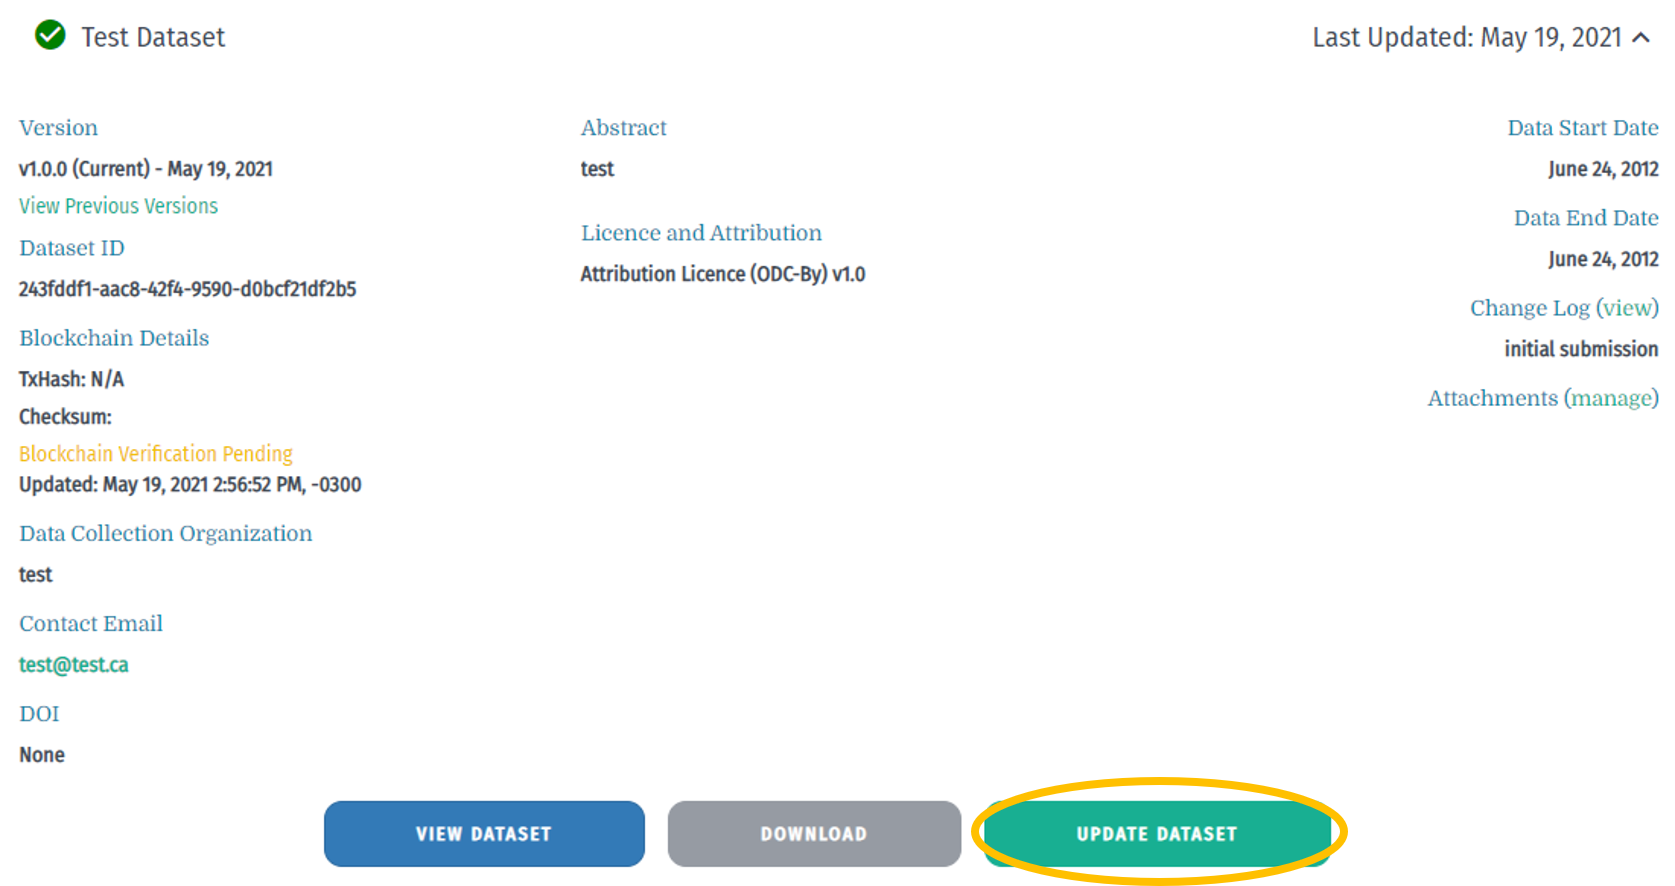
3. From the My Datasets page, select the dataset you would like to update
Click on the dataset to display Metadata information and update options. To add new observations to this dataset, click on the 'Update dataset' button.
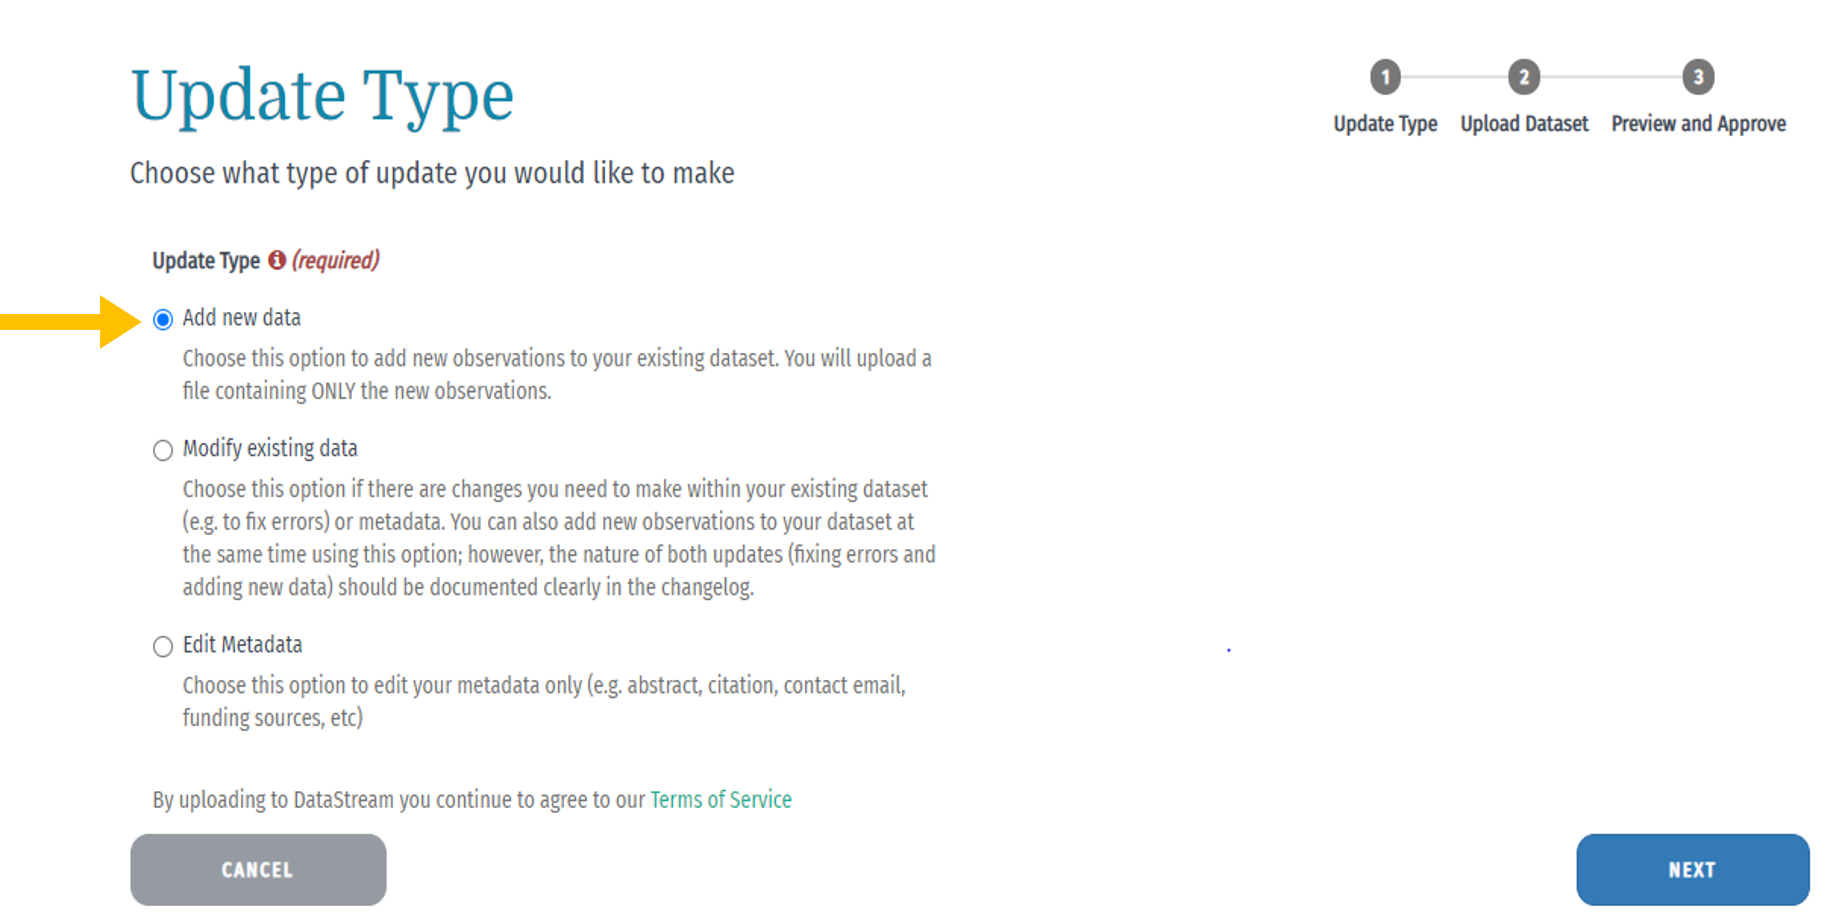
4. Select Add new data as your update type
Select this option if you are looking to add data to an existing dataset. In this case, you include ONLY the new observations to be added.
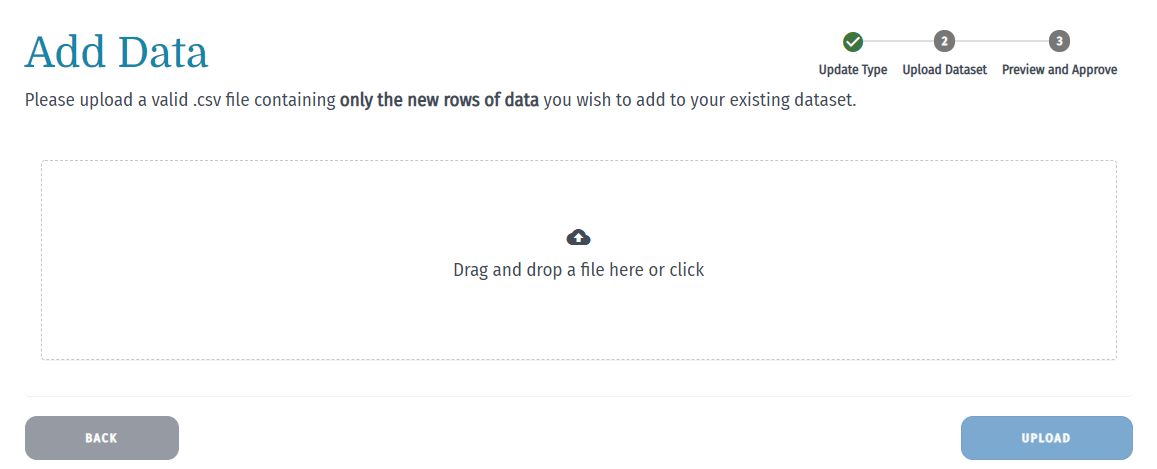
5. Upload .csv file containing ONLY the new data to be added
Drag and drop your .csv file into the box or double click the box to access your file finder to select your file. This data will be added to your existing dataset.
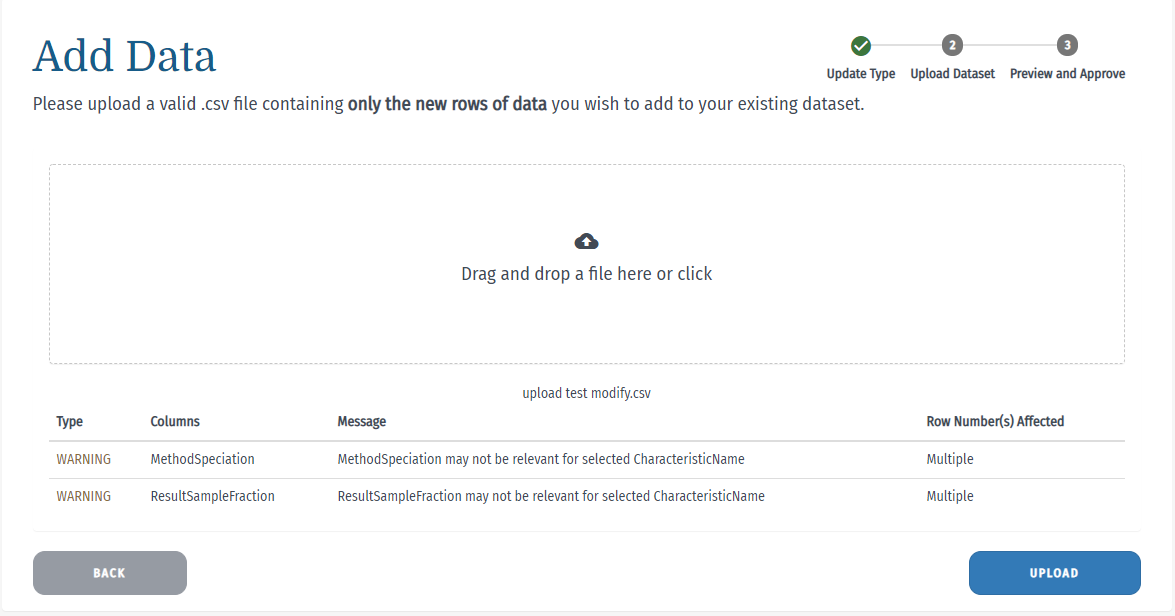
6. Review error and warning messages
Data submitted to DataStream must conform to DataStream’s Upload Template. This template outlines data structure, allowed values, and which fields are required or conditional.
Error messages will alert you to issues that are preventing your file from passing validation and which row numbers are impacted.
Warnings will list issues that may be present in your data and should be reviewed before upload. Warnings will not prevent the data from passing validation.
Once the issues in your file have been resolved, you can drag and drop the file back into the upload box (or double click within the box to access your file finder to locate and select the file).
If you have any questions about the error or warning messages you are seeing please contact us at team@DataStream.org.
7. Preview your dataset
Once your dataset has uploaded, follow the 'Preview dataset' link to ensure the data is displaying properly. It may take a few minutes for the system to process the file and the link to appear. DO NOT close the tab or exit your browser until this appears.
8. Approve or reject your changes
After reviewing your dataset, you can:
- Approve Dataset: Publishes dataset to DataStream (will be visible on the Explore map 24 hours after publishing)
- Reject Changes: Rolls dataset back to version before new addition
- Skip Preview: Takes you to My Datasets page where the changes can be approved or rejected at a later date

Note: After selecting approve or rollback, you will either need to revisit or refresh the page in order for the change to appear on the My Datasets page. This process may take several minutes to complete.
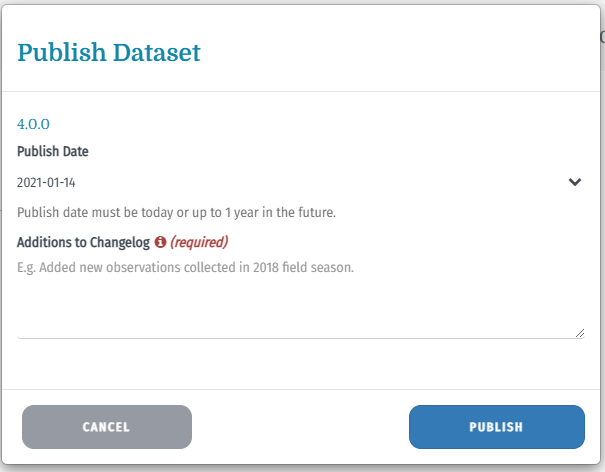
9. Select publish date
Use the dropdown to select your desired publish date. This will be the day when your data will be viewable by others on the DataStream site. To publish immediately, select today’s date, otherwise select up to 1 year into the future (learn more about embargo periods on DataStream).
10. Update Changelog
Use the changelog to record the nature of your dataset update. This information will be helpful for others when trying to understand what updates were made and why.
11. Add attachments (optional)
Once your dataset has been approved and published, click on the dataset from the My Datasets page. Select 'manage' next to Attachments to add documents related to your dataset (e.g. published papers, reports or other analyses, monitoring and QA/QC protocols, etc). Make sure you add a name to the file to complete the attachment process.
Update your dataset - Replace existing data
Follow these steps if there are changes you need to make within your existing dataset (e.g. to fix errors). You can also add new observations to your dataset at the same time using this option; however, the nature of both updates (fixing errors and adding new data) should be documented clearly in the changelog.
1. Log in to your DataStream account
Click 'Login' via the top right header menu on Atlantic DataStream, Great Lakes DataStream, Lake Winnipeg DataStream, Mackenzie DataStream or Pacific DataStream.
2. Go to Upload Data in the header menu
This option should appear once you are logged in with an approved data steward account. For Data Steward approval, email team@DataStream.org. Try refreshing your browser if this option does not display when logged in.
3. From the My Datasets page, select the dataset you would like to update
Click on the dataset to display Metadata information and update options. To modify an existing dataset, click on the 'Update dataset' button.
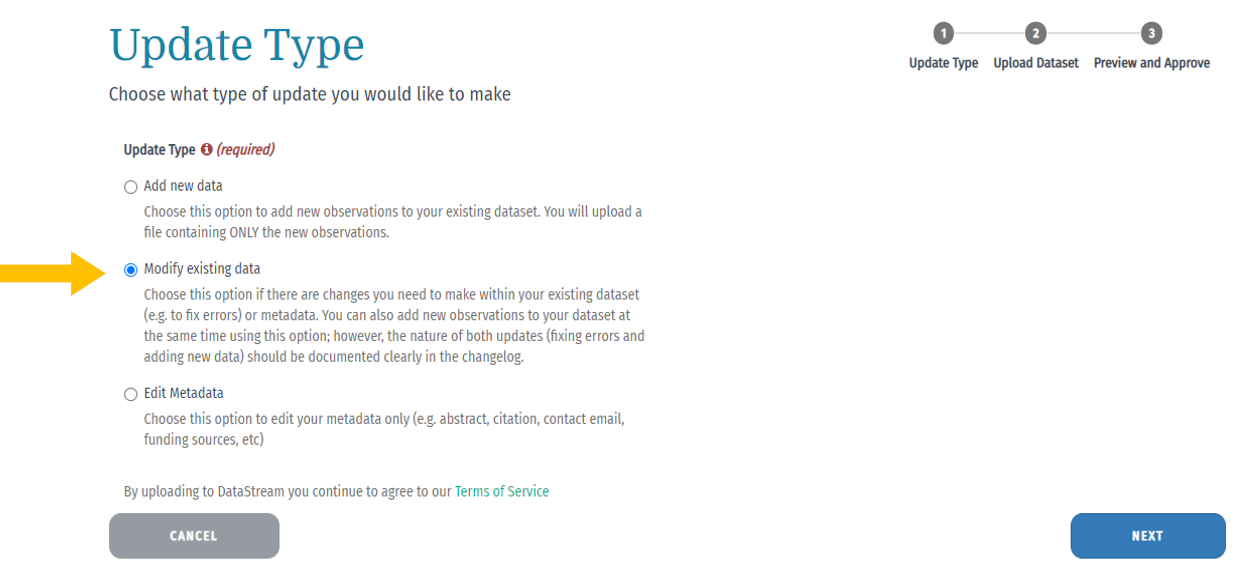
4. Select Modify existing data as your update type
Select this option if you are looking to modify an existing dataset. In this case, you include ALL of the data you wish to be included in the modified dataset. This includes all existing rows, any modified rows, and/or any new rows.
This step will REPLACE your existing dataset with the uploaded file.
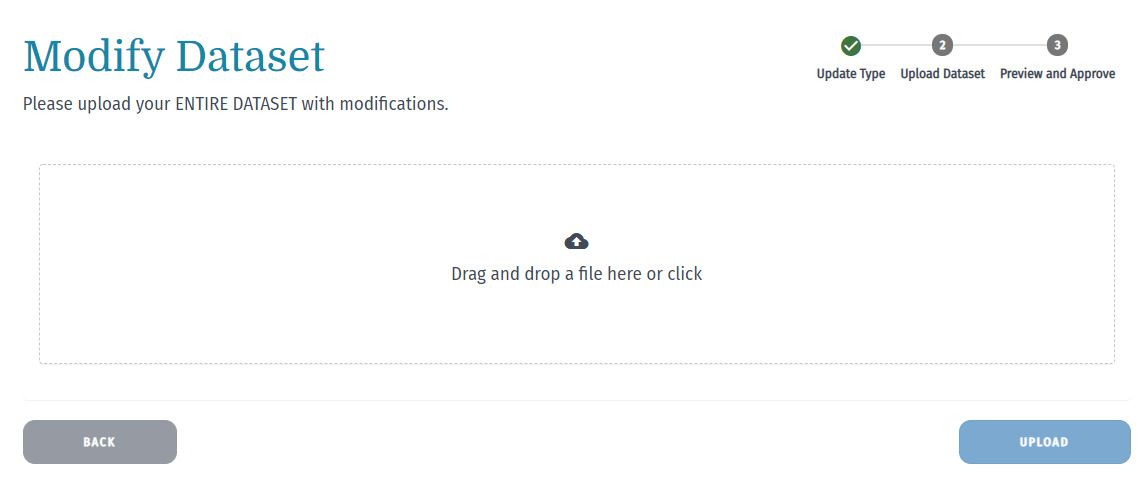
5. Upload .csv file containing ALL data you wish to include in the modified dataset
Drag and drop your .csv file into the box or double click the box to access your file finder to select your file. This data will REPLACE your existing dataset.
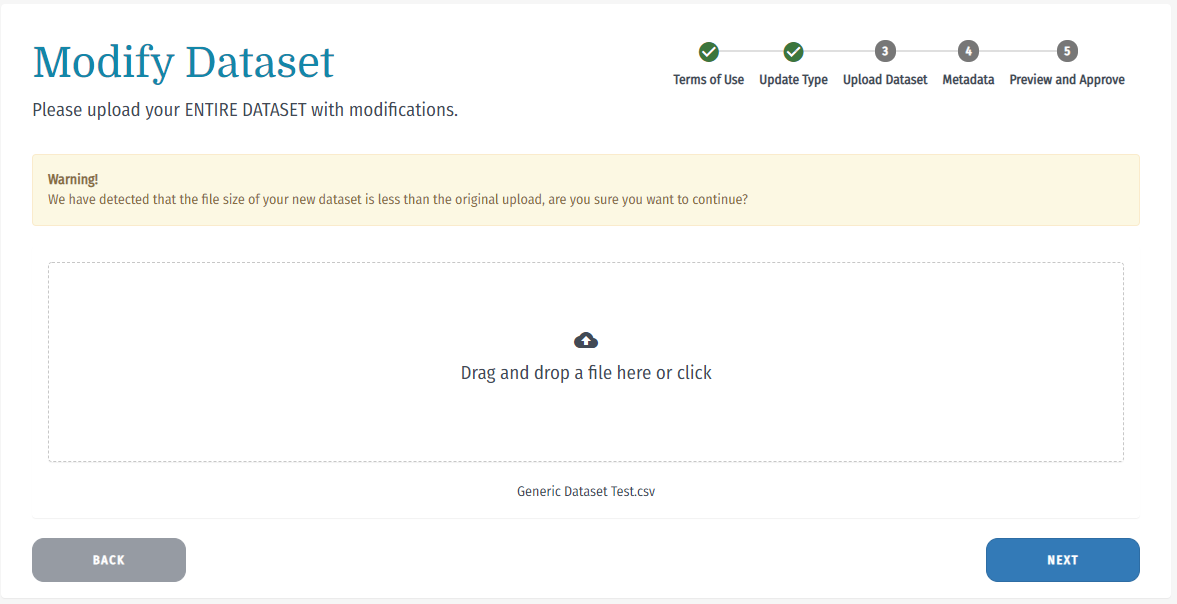
Note that if the dataset you are uploading contains fewer rows than the original dataset you are replacing you will see a warning notice that the new dataset contains less data than the original.
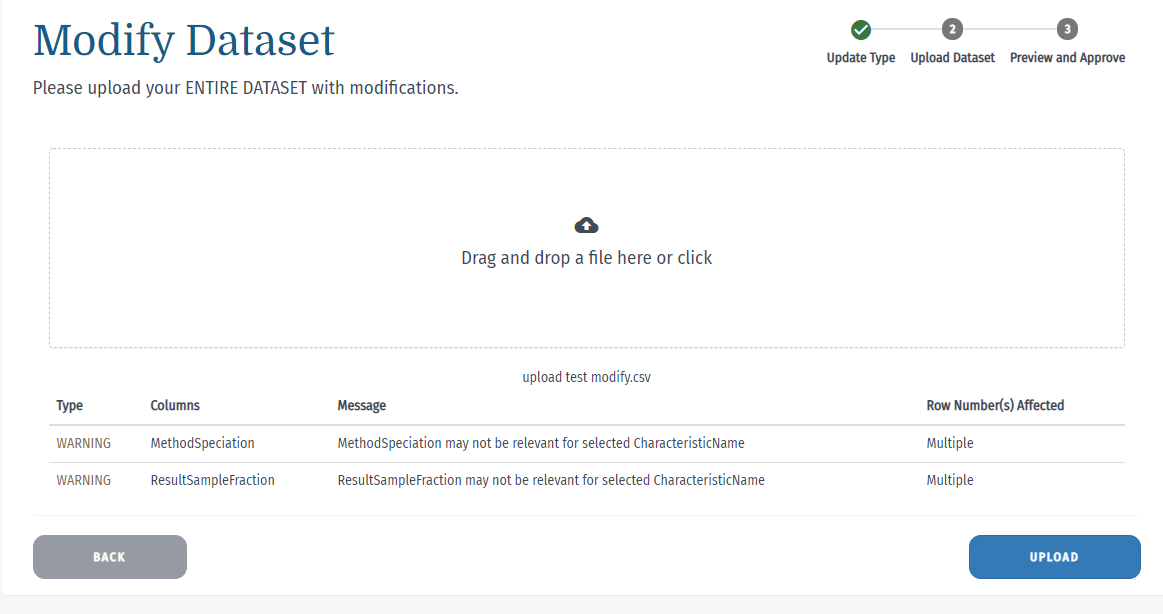
6. Review error and warning messages
Data submitted to DataStream must conform to DataStream’s Upload Template. This template outlines data structure, allowed values, and which fields are required or conditional.
Error messages will alert you to issues that are preventing your file from passing validation and which row numbers are impacted.
Warnings will list issues that may be present in your data and should be reviewed before upload. Warnings will not prevent the data from passing validation.
Once the issues in your file have been resolved, you can drag and drop the file back into the upload box (or double click within the box to access your file finder to locate and select the file).
If you have any questions about the error or warning messages you are seeing please contact us at team@DataStream.org.
7. Preview your dataset
Once your dataset has uploaded, follow the 'Preview dataset' link to ensure the data is displaying properly. It may take a few minutes for the system to process the file and the link to appear. DO NOT close the tab or exit your browser until this appears.
8. Approve or reject your changes
After reviewing your dataset, you can:
- Approve Dataset: Publishes dataset to DataStream (will be visible on the Explore map 24 hours after publishing)
- Reject Changes: Rolls dataset back to version before modification
- Skip Preview: Takes you to My Datasets page where the changes can be approved or rejected at a later date
Note: After selecting approve or reject, you will either need to revisit or refresh the page in order for the change to appear on the My Datasets page. This process may take several minutes to complete.
9. Select Publish Date
Use the dropdown to select your desired publish date. This will be the day when your data will be viewable by others on the DataStream site. To publish immediately select today’s date, otherwise select up to 1 year into the future (learn more about embargo periods on DataStream).

10. Update changelog
Use the changelog to record the nature of your dataset update. This information will be helpful for others when trying to understand what updates were made and why. If you are modifying existing rows and adding new ones make sure to include both of these in your changelog.
11. Add attachments (optional)
Once your dataset has been approved and published, click on the dataset from the My Datasets page. Select 'manage' next to Attachments to add documents related to your dataset (e.g. published papers, reports or other analyses, monitoring and QA/QC protocols, etc). Make sure you add a name to the file to complete the attachment process.
Update your dataset - Edit metadata
Follow these steps to edit your dataset metadata only (e.g. abstract, citation, contact email, funding sources, etc).
1. Log in to your DataStream account
Click 'Login' via the top right header menu on Atlantic DataStream, Great Lakes DataStream, Lake Winnipeg DataStream, Mackenzie DataStream or Pacific DataStream.
2. Go to Upload Data in the header menu
This option should appear once you are logged in with an approved data steward account. For Data Steward approval, email team@DataStream.org. Try refreshing your browser if this option does not display when logged in.
3. From the My Datasets page, select the dataset you would like to update
Click on the dataset to display Metadata information and update options. To modify an existing dataset, click on the 'Update dataset' button.
4. Select Edit Metadata as your update type
Select this option if you are looking to modify a dataset’s metadata only.
5. Update metadata
All fields are editable.
If you have any questions or run into any issues during data formatting and upload, please don’t hesitate to reach out.

If you have any questions or need help uploading your data, our Data Specialists are happy to assist you with this process.